To install the MySQL Enterprise Agent on Windows, double-click the
mysqlmonitoragent-
(where version-windows-installer.exeversion indicates the three-part
version number) installer.
To install the agent as a Windows service, you must do the installation as a privileged user.
On Windows Vista or later, if user account control is on, an operating system dialog box requests confirmation of the installation.
You may can install the Monitor Agent in
unattended mode, for example, to do multiple
installations. For more information on this topic, see
Section 15.6.4, “Unattended Installation”.
To install multiple agents on the same machine, use the
servicename option to the installer to install
each agent with a unique service name. For more information, see
installer_servicename
If the installer identifies an existing installation and you do
not specify an alternative service name, the installer stops.
First, select the language for the MySQL Enterprise Agent installation. Click to continue installation.
Click to start the installation process.
Select the installation directory. The default installation directory is
C:\Program
          Files\MySQL\Enterprise\Agent
. Select the installation directory, or type the new directory location. Click to continue the installation process.Choose one or more operations for this agent to perform:
Enable monitoring a MySQL Server: This is the main operation of monitoring the MySQL server in terms of performance, security and availability.
Enable the MySQL Enterprise Agent Aggregator: It is used for future Connector plugins or user-written methods of transmitting query analyzer data to the MySQL Enterprise Service Manager.
Enable the MySQL Enterprise Agent Proxy Service: To study your query analyzer information by sending your queries through the MySQL Enterprise Agent Proxy Service, switch this option on.
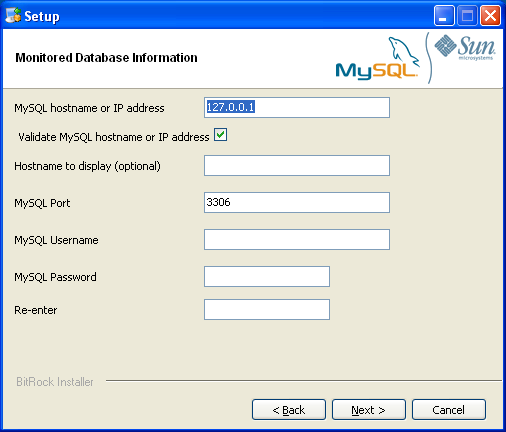
You specify the information about the MySQL server that you want to monitor. Enter the IP address or host name of the host you want to monitor, and the port, user name and password to connect to the MySQL server. To confirm that the MySQL server is currently reachable using the information, ensure that the Validate MySQL host name or IP address checkbox is selected.
NoteCurrently, on Windows, the monitor agent only includes support for connecting to the server to be monitored via TCP/IP, so you cannot monitor a server running with the
--skip-networking.If the MySQL server to be monitored has been started using the command option
--bind-address, the server only listens for connections on the IP address specified, that is, the IP address of the MySQL server. If the monitor agent is started using TCP/IP networking and the default address of 127.0.0.1, it cannot connect to the server to be monitored. Also, if “localhost” is specified as the host name during agent configuration, a connection is not established, as the server listens for connections on the address specified with the--bind-addressoption, not 127.0.0.1.Click to continue the installation.
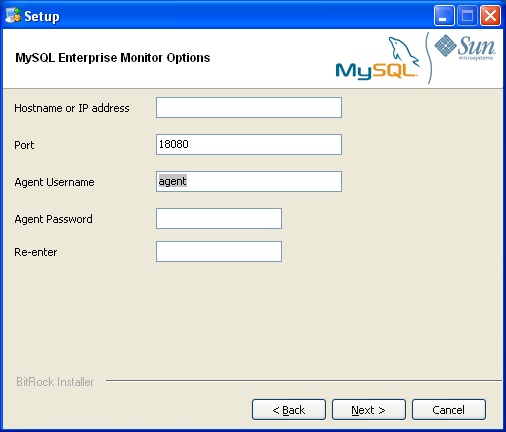
The installer can create the MySQL Enterprise Agent user on the MySQL server that is required to connect to the server and obtain statistical information. The installer can create an account for you, or you can use an existing account. If you want the installer to create the user, enter the credentials of a user (such as the
rootuser) that has the privileges to create the new user and grant it the privileges to monitor the server.The MySQL Enterprise Service Manager that you want to use must be configured during installation. The host name, port and agent authentication information must be entered. If you have already installed MySQL Enterprise Service Manager, you can locate the information in the installation report file created during installation. Enter the required information and then click to continue.
To use Query Analyzer with the MySQL Enterprise Agent Aggregator, configure the aggregator port and SSL settings. For more information on Query Analyzer, see Section 15.13, “The Query Analyzer Tab”.
When MySQL Enterprise Agent Aggregator is enabled, the MySQL Enterprise Agent listens on a network port for connections from Connector plugins providing query analyzer data, forwarding the query analyzer information to MySQL Enterprise Service Manager. You can change the port number that MySQL Enterprise Agent listens for connections from connectors. You can also configure the aggregator to support SSL connections, in which case you must provide the location of the PEM and CA certificate files to be used for SSL support.
The default port is 14000 for non-SSL communication, and 14443 for SSL communication.
To use Query Analyzer with the MySQL Enterprise Agent Proxy Service, enable the MySQL Enterprise Agent Proxy service and configure the port and other information. If you disable the Proxy during installation, you must enable it later before you can use Query Analyzer. For more information on Query Analyzer, see Section 15.13, “The Query Analyzer Tab”.
When Proxy is enabled, MySQL Enterprise Agent listens on a network port for client applications, and forwards the connections to the backend MySQL server. You can change the port number that MySQL Enterprise Agent listens for connections.
The default port is 6446.
You receive a Configuration Report containing the information that you have entered during the installation. Check the information provided in the report. If the information is correct, click to continue. If you see a problem, use to go back to the configuration screen and change the information.
You have a final opportunity to change the installation parameters. Click to start the installation process.
Once the agent is installed, you get a confirmation message. Click to finalize the installation.
You can start the MySQL Enterprise Agent automatically now that the installation is complete. To start the agent now, leave the checkbox selected. To start the agent separately, uncheck the checkbox. Click to exit the installation.
Once the Monitor Agent is installed, you must start it. For information on how to start and stop the Agent, see Section 15.6.3.5.1, “Starting/Stopping the Agent on Windows”.