The ODBC Data Source Administrator within
Windows enables you to create DSNs, check driver installation
and configure ODBC systems such as tracing (used for debugging)
and connection pooling.
Different editions and versions of Windows store the
ODBC Data Source Administrator in different
locations depending on the version of Windows that you are
using.
To open the ODBC Data Source Administrator in
Windows Server 2003:
Because it is possible to create DSN using either the 32-bit
or 64-bit driver, but using the same DNS identifier, it is
advisable to include the driver being used within the DSN
identifier. This will help you to identify the DSN when using
it from applications such as Excel that are only compatible
with the 32-bit driver. For example, you might add
Using32bitCODBC to the DSN identifier for
the 32-bit interface and Using64bitCODBC
for those using the 64-bit Connector/ODBC driver.
On the
Startmenu, chooseAdministrative Tools, and then clickData Sources (ODBC).
To open the ODBC Data Source Administrator in
Windows 2000 Server or Windows 2000 Professional:
On the
Startmenu, chooseSettings, and then clickControl Panel.In
Control Panel, clickAdministrative Tools.In
Administrative Tools, clickData Sources (ODBC).
To open the ODBC Data Source Administrator on
Windows XP:
On the
Startmenu, clickControl Panel.In the
Control Panelwhen inCategory ViewclickPerformance and Maintenanceand then clickAdministrative Tools.. If you are viewing theControl PanelinClassic View, clickAdministrative Tools.In
Administrative Tools, clickData Sources (ODBC).
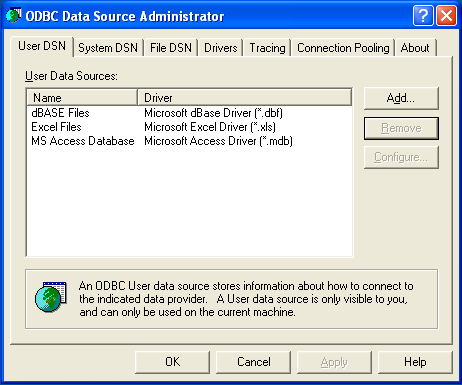
Irrespective of your Windows version, you should be presented
the ODBC Data Source Administrator window:
Within Windows XP, you can add the Administrative
Tools folder to your menu
to make it easier to locate the ODBC Data Source Administrator.
To do this:
Right-click the menu.
Select
Properties.Click .
Select the tab.
Within
Start menu items, within theSystem Administrative Toolssection, selectDisplay on the All Programs menu.
Within both Windows Server 2003 and Windows XP you may want to
permanently add the ODBC Data Source
Administrator to your
menu. To do this, locate the Data Sources
(ODBC) icon using the methods shown, then right-click
on the icon and then choose .
The interfaces for the 3.51 and 5.1 versions of the Connector/ODBC driver are different, although the fields and information that you need to enter remain the same.
To configure a DSN using Connector/ODBC 3.51.x or Connector/ODBC 5.1.0, see Section 22.1.4.3.1, “Configuring a Connector/ODBC 3.51 DSN on Windows”.
To configure a DSN using Connector/ODBC 5.1.1 or later, see Section 22.1.4.3.2, “Configuring a Connector/ODBC 5.1 DSN on Windows”.
To add and configure a new Connector/ODBC data source on
Windows, use the ODBC Data Source
Administrator:
Open the
ODBC Data Source Administrator.To create a System DSN (which will be available to all users) , select the
System DSNtab. To create a User DSN, which will be unique only to the current user, click the button.You will need to select the ODBC driver for this DSN.

Select
MySQL ODBC 3.51 Driver, then click .You now need to configure the specific fields for the DSN you are creating through the
Add Data Source Namedialog.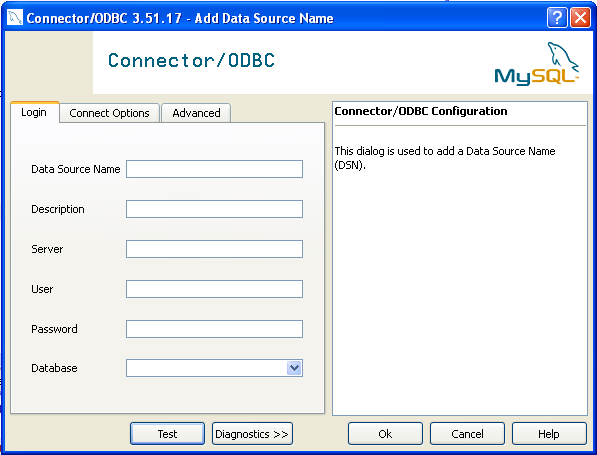
In the Data Source Name box, enter the name of the data source you want to access. It can be any valid name that you choose.
In the Description box, enter some text to help identify the connection.
In the Server field, enter the name of the MySQL server host that you want to access. By default, it is
localhost.In the User field, enter the user name to use for this connection.
In the Password field, enter the corresponding password for this connection.
The Database pop-up should automatically populate with the list of databases that the user has permissions to access.
Click to save the DSN.
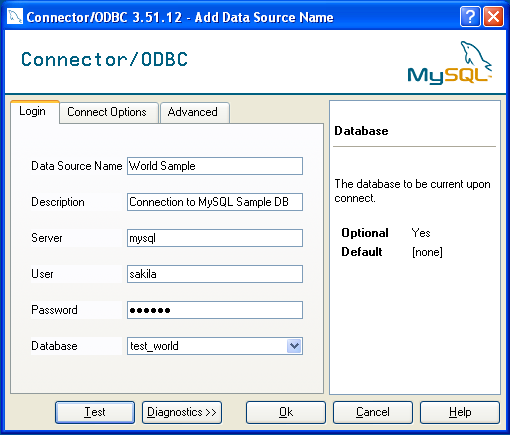
A completed DSN configuration may look like this:
You can verify the connection using the parameters you have
entered by clicking the button. If
the connection could be made successfully, you will be
notified with a Success; connection was
made! dialog.
If the connection failed, you can obtain more information on the test and why it may have failed by clicking the button to show additional error messages.
You can configure a number of options for a specific DSN by using either the or tabs in the DSN configuration dialog.
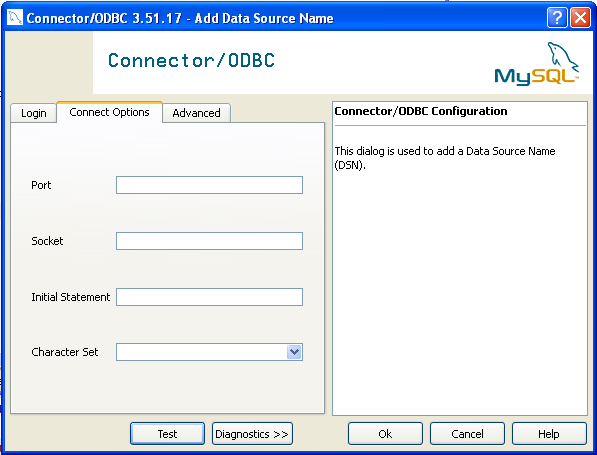
The three options you can configure are:
Port sets the TCP/IP port number to use when communicating with MySQL. Communication with MySQL uses port 3306 by default. If your server is configured to use a different TCP/IP port, you must specify that port number here.
Socket sets the name or location of a specific socket or Windows pipe to use when communicating with MySQL.
Initial Statement defines an SQL statement that will be executed when the connection to MySQL is opened. You can use this to set MySQL options for your connection, such as disabling autocommit.
Character Set is a pop-up list from which you can select the default character set to be used with this connection. The Character Set option was added in 3.5.17.
The tab enables you to configure Connector/ODBC connection parameters. Refer to Section 22.1.4.2, “Connector/ODBC Connection Parameters”, for information about the meaning of these options.
The DSN configuration when using Connector/ODBC 5.1.1 and later has a slightly different layout. Also, due to the native Unicode support within Connector/ODBC 5.1, you no longer need to specify the initial character set to be used with your connection.
To configure a DSN using the Connector/ODBC 5.1.1 or later driver:
Open the
ODBC Data Source Administrator.To create a System DSN (which will be available to all users) , select the System DSN tab. To create a User DSN, which will be unique only to the current user, click the button.
You will need to select the ODBC driver for this DSN.
Select
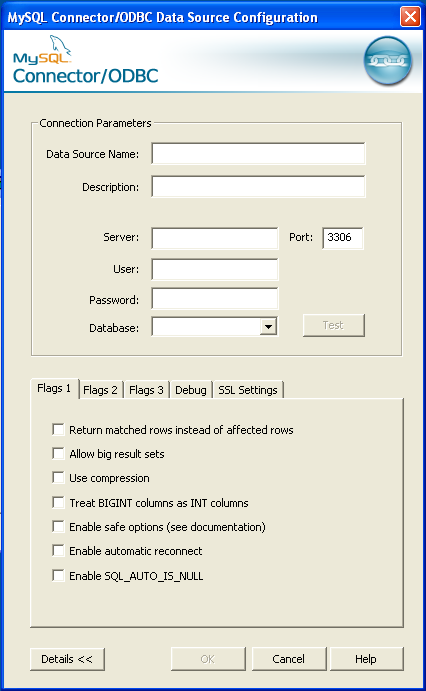
MySQL ODBC 5.1 Driver, then click .You now need to configure the specific fields for the DSN you are creating through the
Connection
              Parameters
dialog.
In the Data Source Name box, enter the name of the data source you want to access. It can be any valid name that you choose.
In the Description box, enter some text to help identify the connection.
In the Server field, enter the name of the MySQL server host that you want to access. By default, it is
localhost.In the User field, enter the user name to use for this connection.
In the Password field, enter the corresponding password for this connection.
The Database pop-up should automatically populate with the list of databases that the user has permissions to access.
To communicate over a different TCP/IP port than the default (3306), change the value of the Port.
Click to save the DSN.
You can verify the connection using the parameters you have
entered by clicking the button. If
the connection could be made successfully, you will be
notified with a Success; connection was
made! dialog.
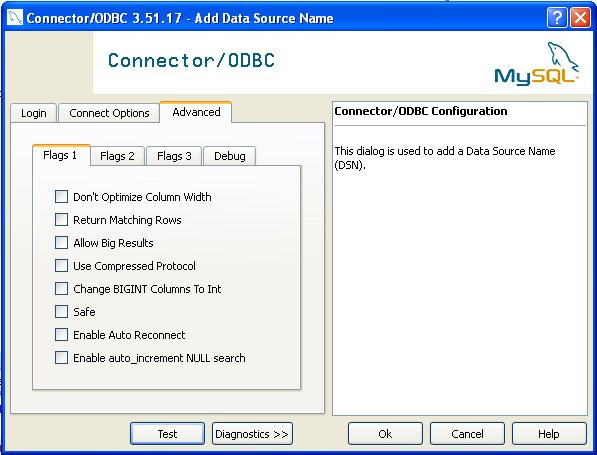
You can configure a number of options for a specific DSN by using the button.
The Details button opens a tabbed display which enables you to set additional options:
Flags 1, Flags 2, and Flags 3 enable you to select the additional flags for the DSN connection. For more information on these flags, see Section 22.1.4.2, “Connector/ODBC Connection Parameters”.
Debug enables you to enable ODBC debugging to record the queries you execute through the DSN to the
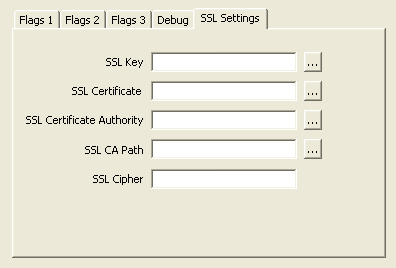
myodbc.sqlfile. For more information, see Section 22.1.4.8, “Getting an ODBC Trace File”.SSL Settings configures the additional options required for using the Secure Sockets Layer (SSL) when communicating with MySQL server. Note that you must have enabled SSL and configured the MySQL server with suitable certificates to communicate over SSL.
The tab enables you to configure Connector/ODBC connection parameters. Refer to Section 22.1.4.2, “Connector/ODBC Connection Parameters”, for information about the meaning of these options.
This section answers Connector/ODBC connection-related questions.
While configuring a Connector/ODBC DSN, a
Could Not Load Translator or Setup
              Library
error occursFor more information, refer to MS KnowledgeBase Article(Q260558). Also, make sure you have the latest valid
ctl3d32.dllin your system directory.On Windows, the default
myodbc3.dllis compiled for optimal performance. If you want to debug Connector/ODBC 3.51 (for example, to enable tracing), you should instead usemyodbc3d.dll. To install this file, copymyodbc3d.dllover the installedmyodbc3.dllfile. Make sure to revert back to the release version of the driver DLL once you are done with the debugging because the debug version may cause performance issues. Note that themyodbc3d.dllisn't included in Connector/ODBC 3.51.07 through 3.51.11. If you are using one of these versions, you should copy that DLL from a previous version (for example, 3.51.06).