There is currently no official solution for providing failover between master and slaves in the event of a failure. With the currently available features, you would have to set up a master and a slave (or several slaves), and to write a script that monitors the master to check whether it is up. Then instruct your applications and the slaves to change master in case of failure.
Remember that you can tell a slave to change its master at any
time, using the CHANGE MASTER TO
statement. The slave will not check whether the databases on the
master are compatible with the slave, it will just start reading
and executing events from the specified binary log coordinates on
the new master. In a failover situation, all the servers in the
group are typically executing the same events from the same binary
log file, so changing the source of the events should not affect
the database structure or integrity providing you are careful.
Run your slaves with the --log-bin
option and without
--log-slave-updates. In this way,
the slave is ready to become a master as soon as you issue
STOP SLAVE;
RESET MASTER, and
CHANGE MASTER TO statement on the
other slaves. For example, assume that you have the structure
shown in Figure 17.4, “Redundancy Using Replication, Initial Structure”.
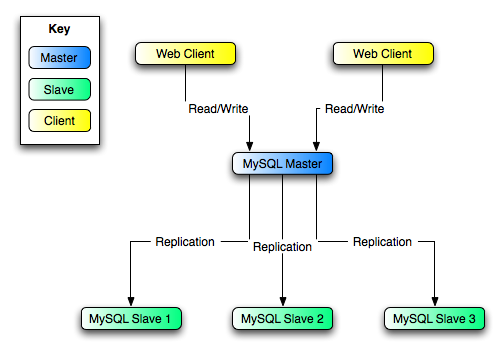
In this diagram, the MySQL Master holds the
master database, the MySQL Slave hosts are
replication slaves, and the Web Client machines
are issuing database reads and writes. Web clients that issue only
reads (and would normally be connected to the slaves) are not
shown, as they do not need to switch to a new server in the event
of failure. For a more detailed example of a read/write scale-out
replication structure, see
Section 17.3.3, “Using Replication for Scale-Out”.
Each MySQL Slave (Slave 1, Slave
2, and Slave 3) is a slave running
with --log-bin and without
--log-slave-updates. Because
updates received by a slave from the master are not logged in the
binary log unless
--log-slave-updates is specified,
the binary log on each slave is empty initially. If for some
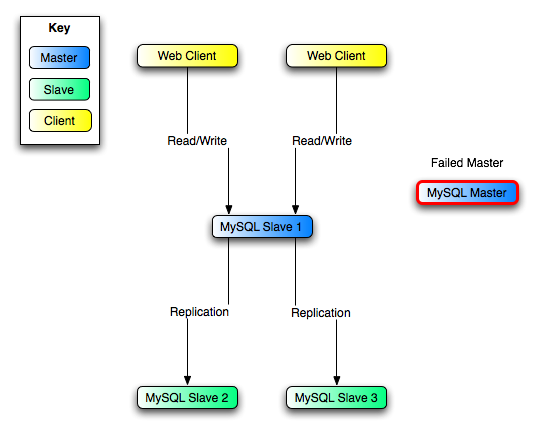
reason MySQL Master becomes unavailable, you
can pick one of the slaves to become the new master. For example,
if you pick Slave 1, all Web
Clients should be redirected to Slave
1, which will log updates to its binary log.
Slave 2 and Slave 3 should
then replicate from Slave 1.
The reason for running the slave without
--log-slave-updates is to prevent
slaves from receiving updates twice in case you cause one of the
slaves to become the new master. Suppose that Slave
1 has --log-slave-updates
enabled. Then it will write updates that it receives from
Master to its own binary log. When
Slave 2 changes from Master
to Slave 1 as its master, it may receive
updates from Slave 1 that it has already
received from Master
Make sure that all slaves have processed any statements in their
relay log. On each slave, issue STOP SLAVE
IO_THREAD, then check the output of
SHOW PROCESSLIST until you see
Has read all relay log. When this is true for
all slaves, they can be reconfigured to the new setup. On the
slave Slave 1 being promoted to become the
master, issue STOP SLAVE and
RESET MASTER.
On the other slaves Slave 2 and Slave
3, use STOP SLAVE and
CHANGE MASTER TO MASTER_HOST='Slave1' (where
'Slave1' represents the real host name of
Slave 1). To use CHANGE
MASTER TO, add all information about how to connect to
Slave 1 from Slave 2 or
Slave 3 (user,
password,
port). In CHANGE
MASTER TO, there is no need to specify the name of the
Slave 1 binary log file or log position to read
from: We know it is the first binary log file and position 4,
which are the defaults for CHANGE MASTER
TO. Finally, use START
SLAVE on Slave 2 and Slave
3.
Once the new replication is in place, you will then need to
instruct each Web Client to direct its
statements to Slave 1. From that point on, all
updates statements sent by Web Client to
Slave 1 are written to the binary log of
Slave 1, which then contains every update
statement sent to Slave 1 since
Master died.
The resulting server structure is shown in Figure 17.5, “Redundancy Using Replication, After Master Failure”.
When Master is up again, you must issue on it
the same CHANGE MASTER TO as that
issued on Slave 2 and Slave
3, so that Master becomes a slave of
S1 and picks up each Web
Client writes that it missed while it was down.
To make Master a master again (for example,
because it is the most powerful machine), use the preceding
procedure as if Slave 1 was unavailable and
Master was to be the new master. During this
procedure, do not forget to run RESET
MASTER on Master before making
Slave 1, Slave 2, and
Slave 3 slaves of Master.
Otherwise, they may pick up old Web Client
writes from before the point at which Master
became unavailable.
Note that there is no synchronization between the different slaves to a master. Some slaves might be ahead of others. This means that the concept outlined in the previous example might not work. In practice, however, the relay logs of different slaves will most likely not be far behind the master, so it would work, anyway (but there is no guarantee).
A good way to keep your applications informed as to the location
of the master is by having a dynamic DNS entry for the master.
With bind you can use
nsupdate to dynamically update your DNS.