Double-clicking the Add table icon in the
Physical Schemata section of the MySQL
Model page adds a table with the default name of
table1. If a table with this name already
exists, the new table is named table2.
Adding a new table automatically opens the table editor docked at the bottom of the application. Using the table editor is described in Section 16.6.7.1.3, “The MySQL Table Editor”.
Right-clicking a table opens a pop-up menu with the following options:
If the table editor is not open the option opens it. If it is already open, the selected table replaces the previous one. opens a new table editor tab.
The cut and copy options are useful for copying tables between different schemata.
Use the to remove a table from the database. There will be no confirmation dialog box.
Any tables added to the Physical Schemata also
show up in the Catalog palette on the right
side of the application. They may be added to an EER Diagram by
dragging and dropping them from this palette.
Tables can also be added to an EER Diagram using the
table tool on the vertical toolbar. To do this
make sure that the EER Diagram tab is selected,
and right-click the table icon on the vertical toolbar. The table
icon is the rectangular tabular icon.
Clicking the mouse on this icon changes the mouse pointer to a table pointer. You can also change the mouse pointer to a table pointer by pressing the T key.
Choosing the table tool changes the contents of
the toolbar that appears immediately below the menu bar. When the
Tables pointer is active, this toolbar contains
a drop down list box of schemata, a drop down list box of engines,
a drop down list box of collations, and a drop down color chart.
Use these list boxes to select the appropriate schema, engine,
collation, and color accent for the new table. Make sure that you
associate the new table with a database. The engine and collation
of a table can easily be changed from the table editor and the
color of your table can be changed later using the
Properties palette. The Default
Engine and Default Collation values
refer to the database defaults.
Create a table by clicking anywhere on the EER Diagram canvas.
Doing this creates a new table with the default name
table1. To revert to the default mouse pointer,
click the arrow icon at the top of the vertical toolbar.
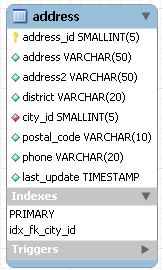
As shown in the preceding diagram the primary key is indicated by a key icon and indexed fields are indicated by a different colored diamond icon. Click the arrow to the right of the table name to toggle the display of the fields. Toggle the display of indexes and triggers in the same way.
Right-clicking a table opens a pop-up menu with the following options:
With the exception of the deletion option, these menu options function as described in Section 16.6.7.1.1, “Adding Tables to the Physical Schemata”. The behavior of the delete option is determined by your MySQL Workbench options settings. For more information, see Section 16.4.4.4, “The Model Tab”.
- 16.6.7.1.3.1. The Main Editor Window
- 16.6.7.1.3.2. The Table Tab
- 16.6.7.1.3.3. The Columns Tab
- 16.6.7.1.3.4. The Indexes Tab
- 16.6.7.1.3.5. The Foreign Keys Tab
- 16.6.7.1.3.6. The Triggers Tab
- 16.6.7.1.3.7. The Partitioning Tab
- 16.6.7.1.3.8. The Options Tab
- 16.6.7.1.3.9. The Inserts Tab
- 16.6.7.1.3.10. The Privileges Tab
The MySQL Table Editor is a component that enables the creation and modification of tables. Using the MySQL Table Editor you can add or modify a table's columns or indexes, change the engine, add foreign keys, or simply alter the table's name.
The MySQL Table Editor can be accessed from the MySQL Workbench by first
selecting the MySQL Model tab and then double
clicking a table in the Physical Schemata panel.
You can also access it from an EER Diagram by double-clicking a
table object.
Any number of tables may be edited in the MySQL Table Editor at any one time. Adding another table creates a new tab at the top of the editor. By default the MySQL Table Editor appears docked at the bottom of the application.
The MySQL Table Editor is shown in the following figure.
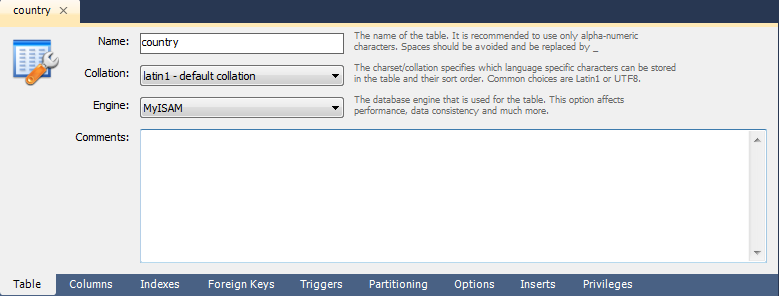
The MySQL Table Editor consists of a work space divided into the following tabs:
Table: Use this table to edit features that apply to the table as a whole
Columns: Use this tab to add or modify columns
Indexes: Use this tab to add or modify indexes
Foreign Keys: Use this tab to add or modify foreign keys
Triggers: Use this tab to add or modify triggers
Partitioning: Use this tab to manage partitioning
Options: Use this tab to add or modify various general, table and row level options
Inserts: Use this tab for writing INSERT statements
Privileges: Use this tab to set privileges on the table
Each of these tabs is discussed in further detail in the following sections.
Use this tab to edit the table name or add a comment to the table. Easily change the collation or the table engine using drop down list boxes.
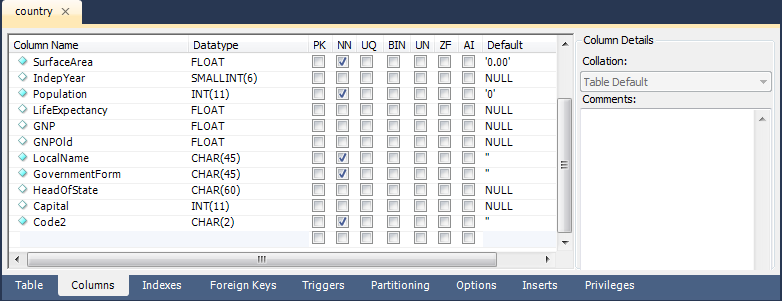
The Columns tab is used to display and edit all
the column information for a table. Using this tab, you can add,
drop, and alter columns.
You can also use the column tab to change the name, data type, default value, and other properties of your table's columns.
To add a column simply click the Column Name
field in an empty row and enter an appropriate value. Select a
data type from the Datatype drop down list
box. Select a column property checkbox as required according to
the following list of column properties:
PK: Primary key
NN: Not null
UQ: Unique
BIN: Binary
UN: Unsigned
ZF: Zero fill
AI: Autoincrement
Right-clicking a row under the Column Name
column opens a pop-up window with the following options:
: Move the selected column up.
: Move the selected column down.
: Select multiple contiguous columns by right-clicking and pressing the Shift key. Use the Ctrl key to select noncontiguous columns.
: Update all information in the
Columnstab.: Clear the assigned default value.
: Set the column default value to
NULL.: Set the column default value to
".
To change the name, data type, default value, or comment of a column, double-click the value you wish to change. The content then becomes editable.
You can also add column comments to the Column
Comment text area. It is also possible to set the column
collation, using the listbox in the Column
Details panel.
To the left of the column name is an icon that indicates whether
the column is a member of the primary key. If the icon is a small
key, that column belongs to the primary key, otherwise the icon is
a blue diamond or a white diamond. A blue diamond indicates the
column has NN set. To add or remove a column from the primary key,
double-click the icon. You can also add a primary key by checking
the PRIMARY KEY checkbox in the Column
Details section of the table editor.
If you wish to create a composite primary key you can select multiple columns and check the PK checkbox. However, there is an additional step that is required, you will need to click the Indexes tab, then in the Index Columns panel you need to set the desired order of the primary keys.
When entering default values, in the case of
CHAR and VARCHAR data
types MySQL Workbench will attempt to automatically add quotation
marks, if the user does not start their entry with one. For
other data types the user must manage quoting if required, as it
will not be handled automatically by MySQL Workbench.
Care must be taken when entering a default value for non-numeric
ENUM columns. When entering a non-numeric
default value it will not be automatically quoted. You must
manually add single quote characters for the default value. Note
that MySQL Workbench will not
prevent you from entering the default value without the single
quotation marks. If a non-numeric default value is entered
without quotation marks, this will lead to errors. For example,
if the model is reverse engineered, the script will contain
unquoted default values for ENUM columns and
will fail if an attempt is made to run the script on MySQL
Server.
The Indexes tab holds all index information for
your table. You can add, drop, and modify indexes using this tab.
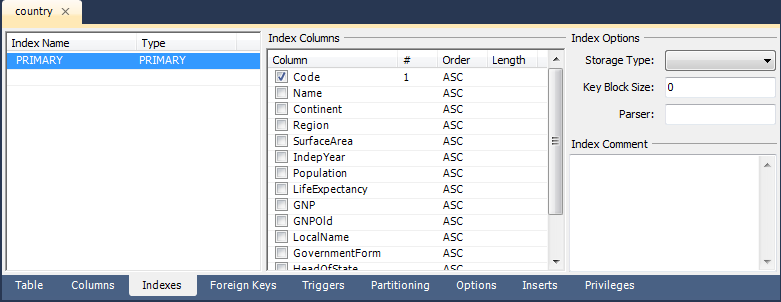
Select an index by right-clicking it. Doing this displays information about the index in the Index Columns section.
To add an index, click the last row in the index list. Enter a name for the index and select the index type from the drop down list box. Select the column or columns that you wish to index by checking the column name in the Index Columns list. You can remove a column from the index by removing the check mark from the appropriate column.
You can also specify the order of an index by choosing
ASC or DESC under the
Order column. Create an index prefix by
specifying a numeric value under the Length
column. You cannot enter a prefix value for fields that have a
data type that does not support prefixing.
To drop an index, right-click the row of the index you wish to delete and then select the menu option.
The Foreign Keys tab is organized in much the
same fashion as the Indexes tab and adding or
editing a foreign key is similar to adding or editing an index.
To add a foreign key, click the last row in the Foreign
Key Name list. Enter a name for the foreign key and
select the column or columns that you wish to index by checking
the column name in the Column list. You can
remove a column from the index by removing the check mark from the
appropriate column.
Under Foreign Key Options choose an action for the update and delete events.
The options are:
RESTRICT
CASCADE
SET NULL
NO ACTION
To drop a foreign key, right-click the row you wish to delete and then select the menu option.
To modify any of the properties of a foreign key, simply select it and make the desired changes.
The Triggers tab opens a text area for editing
an existing trigger or creating a new trigger. Create a trigger as
you would from the command line.
If you wish to enable partitioning for your table check the Enable Partitioning check box. Doing this enables the partitioning options.
The Partition By drop down list box displays the types of partitions you can create. These are:
HASHLINEAR HASHKEYLINEAR KEYRANGELIST
Use the Parameters text box to define the parameter(s) that will be supplied to the partitioning function, an integer column value for example.
Choose the number of partitions from the Partition Count drop down list box. If you wish to manually configure your partitions check the Manual check box. Doing this enables entry of values into the partition configuration table. The entries in this table are:
PartitionValuesData DirectoryIndex DirectoryMin RowsMax RowsComment
Subpartitioning is also available. For more information about partitioning see Chapter 18, Partitioning.
The Options tab enables you to set several types of options. These are grouped into the following frames:
General Options
Row Options
Storage Options
Merge Table options
Each of these is discussed in more detail in the following sections.
General Options
In the General Options frame, choose a pack
keys option. The options are Default,
Pack None, and Pack All. You
may also encrypt the definition of a table. The
AUTO_INCREMENT and delayed key update behaviors
apply only to MyISAM tables.
Row Options
To set the row format, choose the desired row format from the
drop-down list. See Section 13.5.3, “MyISAM Table Storage Formats” for
more information about the different row formats that are
available. This only applies to MyISAM tables.
These options are:
Default
Dynamic
Fixed
Compressed
Redundant
Compact
When you expect a table to be particularly large, use the
Avg. Row, Min. Rows, and
Max. Rows options to enable the MySQL server
to better accommodate your data. See
Section 12.1.14, “CREATE TABLE Syntax” for more information on how to use
these options.
Storage Options
The Storage Options section is used to
configure a custom path to the table storage and data files. This
option can help improve data integrity and server performance by
locating different tables on different hard drives. This option is
only available for MyISAM tables.
Merge Table Options
The Merge Table Options section is used to
configure MERGE tables in MyISAM. To create a MERGE table, select
MERGE as your storage engine and then specify the tables you wish
to MERGE in the Union Tables dialog.
You can also specify the action the server should take when users
attempt to perform INSERT statements on the merge table. See
Section 13.8, “The MERGE Storage Engine” for more information about
MERGE tables. Again, this only applies to MyISAM tables. You may
also select the Merge Method by selecting from
the drop down list box.
Use the Inserts tab to insert records into the
table.
To edit a record simply click the field you wish to change and enter the new data. Right-clicking a row displays a menu with the following items:
Set Field(s) to NULL:
Delete Row(s):
Copy Row Content: Copies the row to the clipboard. Strings are copied quoted, and NULLs are preserved.
Copy Row Content (unquoted): Copies the row to the clipboard. Strings are not quoted and NULLs are copied as a space.
Copy Field Content: Copies the value of the selected field to the clipboard. Strings are quoted.
Copy Field Content (unquoted): Copies the value of the selected field to the clipboard. Strings are not quoted.
Note that the insert editor features a toolbar. This has the same functionality as explained in Section 16.5.7.4.5, “Results Tabsheets” and Section 16.5.7.4.6, “Live Editing Tabsheets”. You can also hover the cursor over the toolbar to display tooltips.
Any records you add will be inserted when you forward engineer the
database (if you choose the Generate INSERT statements
for tables option).
Note when entering string values that there is slightly different behavior between the 5.0, 5.1 and 5.2 versions of MySQL Workbench.
For 5.0 and 5.1 if a string is entered without leading and trailing quotation marks, the Inserts Editor adds quoting and escapes characters that require it. However, if quoted text is entered, the Inserts Editor carries out no further checks since it assumes a correctly escaped and quoted sequence has been entered.
5.2 features a new Inserts Editor. In this case the user enters the string without quoting or escaping and the Inserts Editor takes care of all quoting and escaping as required.
It is possible to enter a function, or other expression, into a
field. If doing so, the prefix \func should
be used, to prevent MySQL Workbench from escaping quotation marks.
For example, if entering the expression
md5('fred') MySQL Workbench would generate the
code md5(\'fred\'). To prevent this enter the
expression as \func md5('fred'). This will
ensure that the quoting is not escaped.
Use the Privileges tab to assign specific roles
and privileges to a table. You may also assign privileges to a
role using the role editor. For a discussion of this topic see
Section 16.6.5.5.1, “Adding Roles”.
When this tab is first opened, all the roles that have been created are displayed in the list box on the right. Move the roles you wish to associate with this table to the Roles list box on the left. Do this by selecting a role and then clicking the button. Use the Shift key to select multiple contiguous roles and the Ctrl key to select noncontiguous roles.
To assign privileges to a role, click the role in the Roles list box. Doing this displays all available privileges in the Assigned Privileges list box. The privileges that display are:
ALLCREATEDROPGRANT OPTIONREFERENCESALTERDELETEINDEXINSERTSELECTUPDATETRIGGER
You can choose to assign all privileges to a specific user or any
other privilege as listed previously. Privileges irrelevant to a
specific table, the FILE privilege for example,
are not shown.
If a role has already been granted privileges on a specific table, those privileges show as already checked in the Assigned Privileges list box.