Some menu options are not available in the OSS version of this application, and are only available in the Standard Edition. This is indicated where applicable.
Use this menu item to open a project, begin a new project, or save
a project. Choosing opens the default
schema, mydb. Choosing opens a file dialog box with the default file type
set to MySQL Workbench Models (MWB). To display a list of recently
opened MWB files, choose the menu
option. The keyboard command to create a new project is
Ctrl N and the command to open
an existing project is Ctrl O.
To close the currently active MySQL Model or
EER
      Diagram
tab, use the option. You can also do this from the keyboard by
pressing Ctrl W. To reopen the
MySQL Model tab, see
Section 16.6.5.1.3, “The View Menu”. To reopen an EER
Diagram tab, double-click the EER
Diagram icon in the EER Diagrams
section of the MySQL Model page.
Use the or menu options to save a model. When you save a model
its name appears in the title bar of the application. If you have
made changes to a project and have not saved those changes, an
asterisk appears in the title bar following the model name. When
you save a model it is saved as a MySQL Workbench file with the
extension mwb.
Use the menu option to import a MySQL
data definition (DDL) script file, one created by issuing the
command mysqldump --no-data,
for example. If the script does not contain a CREATE
db_name; statement, the
schema objects will be copied to the default schema,
mydb. If the script creates a database, a new
tab bearing the database name is added to the Physical
Schemata section of the MySQL Model
page. If the script contains data, it will be ignored. Importing a
DDL script is discussed in detail in
Section 16.6.7.9.1, “Reverse Engineering Using a Create Script”.
Under the menu option you can also
import DBDesigner4 files.
There are variety of options under the menu item. You may generate the SQL statements necessary to create a new database or alter an existing one. These menu items are discussed in detail in Section 16.6.7.10.1, “Forward Engineering Using SQL Scripts”.
Using the menu item you can also export
an EER diagram as a PNG, SVG, PDF or Postscript file. For an
example of a PNG file see Figure 16.82, “The sakila EER Diagram”.
The menu item enables you to set the paper size, orientation and margins for printing purposes.
The print options are only enabled if the EER Diagrams tab is selected. You have the choice of printing your model directly to your printer, printing it as a PDF file, or creating a PostScript file. For more information see Section 16.6.9, “Printing”.
The printing options are only available in commercial versions of MySQL Workbench.
Use the menu option to set the following properties of your project:
Name: Defaults toMySQL ModelVersion: The project version number.Author: The project author.Project: The project name.Created: Not editable, determined by the MWB file attributes.Last Changed: Not editable, determined by the MWB file attributes.Description: A description of your project.
Under this menu item find the options for cutting, copying, and pasting. These actions can also be performed using the Ctrl X, Ctrl C, and Ctrl V key combinations. Undo a deletion using the option. The Ctrl Z key combination can also be used to undo an operation. It is also possible to carry out a operation using either the menu item, or the key combination Ctrl Y.
Also find a menu item for removing the currently selected object. The text description for this menu item changes to reflect the name of the currently selected object. The keyboard command for this action is Ctrl Delete. You can also right click an object and choose the delete option from the pop-up menu.
The menu item behaves differently depending upon circumstances. For instance, if an EER Diagram is active and a table on the canvas is the currently selected object, a dialog box may open asking whether you want to remove the table from the canvas only or from the database as well. For setting the default behavior when deleting from an EER Diagram see Section 16.4.4.4, “The Model Tab”.
If the MySQL Model page is active, the
selected object will be deleted from the catalog and there will
be no confirmation dialog box.
Choose to edit the currently selected object. You can also perform edits in a new window by selecting . The keyboard shortcut for is Ctrl E and Ctrl Shift E for .
The option has the following submenus:
(Keyboard shortcut, Ctrl A): Select all the objects on the active EER diagram.
(Objects of the same type): Use this option to find objects similar to the currently selected object.
: Use this option to find all the objects connected to the currently selected object.
These menu items are only active when an EER Diagram tab is selected. The and the menu options are disabled if no object is currently selected on an EER diagram.
When multiple objects have been selected using one of these menu options, you can navigate between selected items by choosing the or menu options.
Selecting items changes some of the menu options. If only one object is selected, that object's name appears after the , and menu options. If more than one object is selected, these menu items show the number of objects selected.
The menu item displays a sub-menu with the following menu items:
: Takes you to the toolbar search box. You can look for objects in the current view. Find can locate objects in the Model view, the EER Diagram view, and also in the Catalog palette.
: Finds the next occurrence of the object.
: Finds the previous occurrence of the object.
: Displays the Search and Replace dialog. This is currently only for use with the SQL Editor, to allow you to quickly search and replace script code items.
The Standard Edition of MySQL Workbench includes a more advanced Find facility:
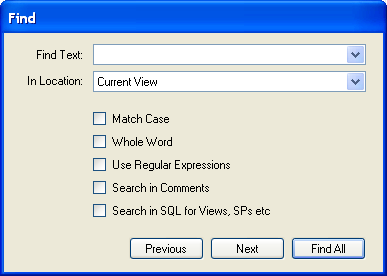
You can search the following locations:
Entire Model: Search the entire model.
Current View: Search the current view only. This may be the
MySQL Modelpage.All Views: Search the
MySQL Model Pageand all EER diagrams.Database Objects: Search database objects only.
Selected Figures: Search the currently selected objects. This feature only works for EER diagrams.
Enter the text you wish to search for in the Find Text drop down list box. You may also select any or all of the following check boxes:
Match Case
Whole Word
Use Regular Expression
Search in Comments
Search in SQL for Views, SPs etc.
Any text you enter into the Find Text drop down list box is retained for the duration of your session. Use the or buttons to find occurrences of your search criterion.
Clicking the button opens a Find Results window anchored at the bottom of the application. If you wish, you may undock this window as you would any other.
Use this window to navigate to objects. For example, double
clicking the Description of an object located
on an EER diagram navigates to the specific diagram and selects
the object. Notice that the properties of the object are
displayed in the Properties palette.
The Find dialog window can also be opened
using the Ctrl F key
combination. Use Ctrl G to
find the next occurrence and Ctrl
Shift G to find a previous
occurrence. Close the Find dialog window by
clicking the in the top right corner or
by pressing the Esc key.
This menu option enables you to set global preferences for the MySQL Workbench application.
For further information see Section 16.4.4, “Workbench Preferences”.
The Options available under this menu item are:
: Selects the Home screen.
: Open the
Model Navigatorpalette: Open the
Catalogpalette: Open the
Layerspalette: Open the
User Datatypespalette: Open the
Descriptionpalette: Open the
Propertiespalette: Open the
Historypalette
These menu options provide a means for opening the windows associated with these options.
: Use this option to display the console output. The keyboard shortcut for this menu item is Ctrl F2.
: Open the GRT shell. For more information about the GRT shell see Section 16.8.5, “The Workbench Scripting Shell”. The keyboard shortcut for opening the GRT shell is Ctrl F3.
: Reset all windows to their default layout.
: The default level of detail of an EER diagram.
: Zoom in on an EER diagram.
: Zoom out from an EER diagram.
The ability to zoom in on an EER diagram is also available using the slider tool in the
Model Navigatorpalette. See Section 16.6.5.8, “The Model Navigator Panel”.: Use this option to bookmark an object. From the keyboard select the object you wish to bookmark and use the key combination Ctrl Shift and the number of the marker (1 through 9). You may create up to nine markers.
: Return to a marker. From the keyboard use the Ctrl key and the number of the marker.
The Arrange menu option applies only to objects
on an EER diagram canvas and is only visible if an EER diagram
view is active. The options under this menu item are as follows:
: Align items on the canvas to the grid lines.
: Use this option to bring objects to the foreground.
: Use this option to move objects to the background.
: Use this option to center objects on the canvas.
: Use this option to automatically arrange objects on the canvas.
: This option expands an object on an EER diagram. For example, if a table has a long column name that is not fully displayed, using this menu option will expand the table making the column visible. This menu item is not enabled until an object is selected.
: Use this option to expand all objects on an EER diagram. This option will display a table's columns if the object notation supports expansion. Some object notations, such as
Classic, do not allow for expansion or contraction. Indexes will not automatically be expanded unless they were previously expanded and have been collapsed using the menu option.: Undo the operation performed by .
The menu options available under the Model menu
item are as follows:
Add Diagram: Create a new EER Diagram. The keyboard shortcut is Ctrl T.
Create Diagram From Catalog Objects: Create an EER diagram from all the objects in the catalog.
DBDoc – Model Reporting...: For information on using this menu option see Section 16.6.5.1.5.1, “The DBDoc Model Reporting Dialog Window (Commercial Version)”. Commercial version only.
User Defined Types: Choosing this menu option presents you with a dialog box, allowing you to add and delete user defined data types.
Object Notation: The items available under this option are discussed in Section 16.6.5.1.5.3, “The Object Notation Menu Options”.
Relationship Notation: The items available under this option are discussed in Section 16.6.5.1.5.4, “The Relationship Notation Menu Option”.
Diagram Properties and Size: Choosing this menu option opens a diagram size dialog box. Use this dialog box to adjust the width or height of the canvas. The unit of measure is pages; the default value is two.
When you have tables with numerous columns, use this menu option to increase the size of the EER.
Validation: The items available under this option are discussed in Section 16.6.5.1.5.2, “The Validation Menu Options (Commercial Version)”. Commercial version only.
Model Options: Set options at the model level. These options should not be confused with the options that are set globally for the Workbench application, and which are now referred to as Workbench Preferences. The available model options are a subset of the Workbench Preferences options.
For more information on Workbench Preferences see Section 16.4.4.4, “The Model Tab”.
This dialog window is found by navigating to the menu item and choosing the option.
The option is not available in the MySQL Workbench OSS version.
Use this dialog window to set the options for creating documentation of your database models.
You can about this menu item in more detail in the following section The DBDoc Model Reporting Dialog Window.
Under the menu option there are two validation options, and . Use these options for general validation and MySQL-specific validation of the objects and relationships defined in your model.
These options are not available in the MySQL Workbench OSS version.
Under the option the menu items are:
: Perform all the validation options available
: Check for objects with no content, for example a table with no columns
: Check the efficiency of tables, for example a table with no primary key defined
: Check for duplicate identifiers, for example two tables with the same name
: Check for consistent naming conventions
: Check, for example, that a foreign key does not reference a nonprimary key column in the source table
Under the option the menu items are:
: Perform all the validation options available
: Check for invalid references, for example, a table name longer than the maximum allowed
: Check for correct SQL syntax
: Check for objects with the same name
For detailed information about validation see Section 16.6.10, “MySQL Workbench Schema Validation Plugins (Commercial Version)”.
The options under the menu apply exclusively to an EER diagram. They are grayed out if an EER diagram tab is not selected.
The menu options are as follows:
: Display table columns, indexes, and triggers.
: Show only a table's columns.
: Show only columns that are primary and foreign keys.
: Similar to the
Workbench (Simplified)style showing only the table's columns.: The ICAM DEFinition language information modeling style.
The object notation style that you choose persists for the duration of your MySQL Workbench session and is saved along with your model. When MySQL Workbench is restarted, the object notation reverts to the default.
If you plan to export or print an EER diagram be sure to decide on a notation style first. Changing notation styles after objects have been placed on a diagram can significantly change the appearance of the diagram.
The options under the menu apply exclusively to an EER diagram. They are grayed out if an EER diagram tab is not selected. The menu options are as follows:
: The default modeling style. For an example see Figure 16.79, “Adding Tables to the Canvas”.
: Uses a diamond shape to indicate cardinality.
: Universal Modeling Language style.
: The ICAM DEFinition language information modeling method
To view the different styles, set up a relationship between two or more tables and choose the different menu options
The relationship notation style that you choose persists for the
duration of your MySQL Workbench session and is saved along with
your model. When MySQL Workbench is restarted, the relationship
notation reverts to the default, the Crow's
Foot style.
If you plan to export or print an EER diagram be sure to decide on a notation style first. Changing notation styles after objects have been placed on a diagram can significantly change the appearance of the diagram.
There are several options under the menu option:
: Launche the SQL Editor, which enables you to create SQL code and execute it on a live server. For more information see Section 16.5.7, “SQL Editor”.
: Launche the Manage DB Connections dialog, which enables you to create and manage multiple connections. For more information see Section 16.5.6, “Manage DB Connections Dialog”
: Create a model from an existing database. For more information, see Section 16.6.7.9.2, “Reverse Engineering a Live Database”.
: Create a database from a model. For more information, see Section 16.6.7.10.2, “Forward Engineering to a Live Server”.
: Synchronize your database model with an existing database. For more information, see Section 16.6.7.10.3, “Database Synchronization”.
: Compare your schema model with a live database or a script file. Section 16.6.7.10.4, “Creating a Catalog Diff Report”.
The menu option lists any plugins that you may have installed. For more information about this menu option see Section 16.8.3, “Plugins”.
This menu currently has three items:
: Launches the MySQL Workbench Scripting Shell.
: Executes the specified script.
: Enables you to load and install a plugin/module file.
The menu option offers the following choices:
Use these menu options to go online and learn more about MySQL Workbench.
The menu option offers the following choices:
: Open a window showing the MySQL Workbench documentation. Read, search, or print the documentation from this window.
: Open your default browser on the MySQL Workbench website and check for a newer version.
: Update to the latest version.
: Open your default browser on the MySQL website home page.
: Open your default browser on the MySQL Workbench product page.
: Information about your system, useful when reporting a bug. For more information, see Section 16.6.5.1.10.1, “System Info”.
: Open your default browser on the MySQL bug report page.
: Open your default browser to see a list of current bugs.
: Show the MySQL Workbench
Aboutwindow.
Use these menu options to go online and learn more about MySQL Workbench.
Use the menu option to determine information about your system. This option is especially useful for determining your rendering mode. Sample output follows.
read_mysql_cfg_file  C:\Program Files\MySQL\MySQL Server 5.1\my.ini
[('tmp_table_size', '9M'),
('myisam_sort_buffer_size', '18M'),
('table_cache', '256'),
('read_rnd_buffer_size', '256K'),
('port', '3306'), ('max_connections', '100'),
('innodb_buffer_pool_size', '18M'),
('myisam_max_sort_file_size', '100G'),
('sql-mode', '"STRICT_TRANS_TABLES,NO_AUTO_CREATE_USER,NO_ENGINE_SUBSTITUTION"'),
('basedir', '"C:/Program Files/MySQL/MySQL Server 5.1/"'),
('default-character-set', 'latin1'),
('datadir', '"C:/ProgramData/MySQL/MySQL Server 5.1/Data/"'),
('innodb_log_buffer_size', '1M'),
('innodb_log_file_size', '10M'),
('innodb_thread_concurrency', '8'),
('read_buffer_size', '64K'),
('innodb_additional_mem_pool_size', '2M'),
('thread_cache_size', '8'),
('innodb_flush_log_at_trx_commit', '1'),
('query_cache_size', '0'),
('sort_buffer_size', '256K'),
('default-storage-engine', 'INNODB'),
('key_buffer_size', '11M')]
MySQL Workbench OSS for Windows version 5.2.8
Cairo Version: 1.8.6
Rendering Mode: GDI requested (create a diagram to confirm)
OpenGL Driver Version: Not Detected
OS: unknown
CPU: Intel(R) Core(TM)2 Duo CPU     T9300  @ 2.50GHz, 1.0 GB RAM
Video adapter info:
Adapter type: VirtualBox Graphics Adapter
Chip Type: VBOX
BIOS String: Version 0xB0C2 or later
Video Memory: 12288 KB